Craft shop in Wath-upon-Dearne Rotherham and webshop too. If you like to craft, you'll love JB-Crafting Supplies. Classes, workshops and Events held in store regularly. We stock, rubber stamps, ink pads, die cutters, embossing folders, fabric, haberdashery, wool and much much more.
Monday, 29 October 2007
Easter Digital Layout
I
I must admit that I have let my scrapbooking slide a bit lately but today I did this layout of my two youngest from Easter. I have decided that when I have finished making my Christmas cards I will get back into scrapbooking.
Hope you enjoy looking at this layout!
Sunday, 28 October 2007
Walk Around the Lake
Well today started off with rain and I thought we were in for a bad day but then the sun came out.
Jake and Adele went off out to the pictures for the day so Kevin and myself thought we would go for a walk around the local lake and here are some off the pictures I took.
Hope you enjoy looking at these photos, we had a fab day on our own. When you have children you don't get much time to yourself so you have to make the most of it.
see you soon!
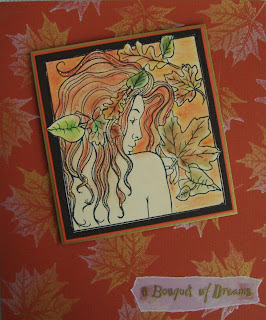
Autumn Birthday Card
I made this card for a friends birthday.
The leaves on the main card are stamped using a Brilliance Mineral ink pad. The La Femme image is an unmounted stamp that I bought from Katy's Corner a few years ago and I just love these stamps. The image is coloured in with chalks and then I added some glitter glue to highlight her hair.
Hope you enjoy the card.
Have great Sunday see you soon.
Thursday, 25 October 2007
Acetate & Nestabilities Dies
Wednesday, 24 October 2007
Tunnel Card
Tuesday, 23 October 2007
Another Poinsettia Card
Today I thought I would post another poinsettia card, I really love this PSX stamp. The card took a while to make but I think it is worth it especially if I send to somebody who will appreciate all the hard work I have put into making it.
I hope you enjoy looking at this card, now I have to go and get ready for work.
Monday, 22 October 2007
Craft Show At Doncaster
Sunday I went to a lovely craft show at the Dome in Doncaster, with my daughter Adele. We had a lovely day and spent plenty, as you can see from the above photo. Saw lots of old friends which was really nice as I have not been to many shows over the last 3 years. I spent a bit of time this morning playing with my Friendly Plastic and new molds,what fun!.
After we had finished at the show yesterday we decided to go to Wentworth for a walk as it was such a lovely day.
Glittery Butterfly
Wednesday, 17 October 2007
Snowman Tag Card
This snowman tag I made up for last Christmas and I did not use him, so I thought I would put him to good use this year.
I started off with a piece of A4 white hammer card folded in half, then placed a piece of torn snowflake vellum on the front of the card with brads. I used my snowflake embossing folder on a piece of ice gold cs and then ran my Mica Magic lilac ink pad over the snowflakes, then attached a piece of lilac organza ribbon. I finished off the snowflakes with some glitter glue.
Thanks for looking!
Tuesday, 16 October 2007
Concertina Anniversary Card
I made this concertina card for my friends Wedding Anniversary tomorrow.
I used a rollagraph to create the background. The verse stamp came from Hero Arts and the three flower stamps came from Stamps To Your Arts Content, I can't remember where the dragonfly stamp is from. The flowers I have watercoloured and then I added some glitter glue to give a bit of bling. The flower images have been layered on to burgundy cs.
Happy Crafting
Enjoy!
Monday, 15 October 2007
Origami Boxes
While searching the Internet on how to make boxes on Friday evening, I came across this wonderful tutorial on kwernerdesign blog.
These boxes are so easy to make, I watched the tutorial twice then I was well away.
The poinsettia box is made from paper and is quite firm.
The papers came from Woodware, the poinsettias are from PSX ( i have have this a while) and the red paper is by Magenta.
The snowflake paper on the other box is from Woodware and again it's PSX.
The organza ribbon is from Woodware.
I decorated the top of the boxes with die cuts.
I will certainly be making lost more of these boxes.
Happy Crafting!
Snowflake Card
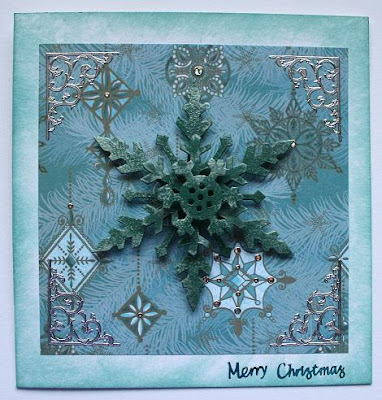
I went to the Range a couple of weeks ago and found this lovely pack of 8 x 8 paper called Xmas Blue from Dovecraft and I also bought the brads to match.
I came across some die cut snowflakes that I had bought from a show last year in green but I thought they were too dark for the paper, so I used a Mica Magic Lime Gloss and gently stippled over the snowflakes and was amazed at the lovely colour match I had got with the paper. My main card was a white hammer but it looked to bright with the paper and snowflakes so I found out a ColorBox pigment ink pad in Celadon and went over the white card which I then heat set. Then I stuck my paper on, placed my snowflakes on which I'd 3D, placed silver peel offs in the corners, coloured a silver peel off Merry Christmas with a Sharpie permanent marker from Tesco and then finished off the card by placing sparkly peel off dots on the ornaments of the background paper.
The photo makes the card more blue than green but looks quite good in the flesh. The main thing is that I am happy with it.
Happy Crafting!
Sunday, 14 October 2007
Shadow Box Card
The other day while looking on the splitcoast stampers site I came across this really neat Technique Spotlight Challenge about making a shadow box card. So I had ago and this is my shadow box card using a snowman rubber stamp, snowflake buttons, bazzill blue cs, snowflake cs from QVC, gel pens, coluzzle oval template and a peel off Merry Christmas. Very good instructions given and quite easy to make. You can flatten the card for postage.
Hope you enjoy this card!
Friday, 12 October 2007
Poinsettia Card
I seem to be on a roll today two posts in one day wow!
The photo of this card does not do it justice, so I am a bit disappointed.
I used an A4 gold card folded in half and then covered the card with a piece of gold organza with solid gold stars printed on. Then I edged the card with some deep red satin ribbon. The Poinsettia stamp is from PSX and is one of my all time favourite stamps and is very well used and loved. I have embossed the Poinsettia with gold ep twice and then watercoloured. I them added some glitter glue for an extra bit of bling!
Enjoy
BellaBalloon
I made this bella card for a friends birthday.I used an A4 white hammer card folded in half, Baby Blue Odyssey paper by Magenta for the background, lilac Bazzill cs which has been run through the Cuttlebug with the swirl emosssing plate, Prima flowers & lilac brads from Woodware. I watercoloured Bella and used Diamond Glaze on the balloons and then glittered her dress. I went over the swirls with a Mica Magic purple ink pad.
This Bella card I thought would do for a December birthday, with all the gold & reds. I have gone over the swirls with a Mica Magic gold ink pad. It's a shame it does not show up very well in the photo.
Enjoy!
This Bella card I thought would do for a December birthday, with all the gold & reds. I have gone over the swirls with a Mica Magic gold ink pad. It's a shame it does not show up very well in the photo.
Enjoy!
Thursday, 11 October 2007
Cute Snowman
Today while I was blog hopping I came across this wonderful blog by Julee Poetic Artistry
There is a card called Polar Holiday which is fantastic and I had a go at making a card very similar.
My main card is white and I added some colour using Mica Magic baby blue, I then stamped Warm Winter Wishes around the main card with the same ink pad. I then used my cuttlebug snowflake embossing folder on a piece of white cs and coloured this with the Mica Magic baby blue and then layered this on some bazzill blue cs. Cut two ovals using my Creative Memories templates. Embossed the white oval with the snowflake and then added a rub-on snowman. Layered this on a darker blue bazzill cs and used my decorative scissors for the edge. Then added some blue organza ribbon from Woodware to finish it off.
Happy crafting!
Tuesday, 9 October 2007
Snownam on a bottle
I made this Christmas card for my son Jake.
I used the bottle template from the Wendy Stenton range, covered it with blue Let it Snow paper.Embossed the top in silver, then added three stripes of silver peel offs. Die cut the snowman and snowflakes and attached to the card. This is a very quick and easy card to make!
Enjoy
Wow! it is great to be back on line again. We have had no Internet for 3 days OMG I have missed my blogging. Anyway today's card is another House Mouse Christmas Tale. It is made up very similar to the last one, the only difference is I added glitter to all of the book and it looks very effective in the flesh.
Thanks for looking
Thursday, 4 October 2007
A Christmas Tale
I was having a look through my Christmas stamps last night and came accross this lovely House Mouse, A Christmas Tale rubber stamp. I have had this stamp for a while and the usual thing I had never used it. I just love H M stamps but the do take a long time to colour. Anyway here is how it is made.
- A4 red cs folded in half.
- White watercolour card
- Watercolour crayons
- White ice gold card
- Red chalk ink pad
- Snowflake Cuttlebug embossing folder.
- Diamond glaze.
- Diamond glitter glue.
- Black Stazon ink pad.
- White snowflake button.
- 12 x 12 sheet of paper from Chloe's Closet called Reindeer Games.
- Peel off Merry Christmas
- Corner punch.
- Fold your A4 card in half.
- You need an 8cm strip of the Reindeer paper, which you have torn across the top, stuck to the bottom of the card.
- Stamp your image onto watercolour card. Cut to size, then paint, leave to dry.
- Use your cuttle bug folder and emboss the ice gold cs which measures 13 x 10 cm. Then stick this to your main card.
- Round your corners on your main image, then go around with a red chalk ink pad.
- Use double sided foam pads to stick this image to your card.
- Stick your snowflake button on using diamond glaze.
- I have added some glitter around the edge of the book, to give a bit of Christmas magic!
- Then I applied some diamond glaze to the candle.
Happy crafting until next time.
Wednesday, 3 October 2007
A Jolly Happy Soul!
I made this card for one of my card classes but I can not remember who makes the snowman rubber stamp as I borrowed it. The verse is from Hero Arts and the snowflakes and let it snow I think are from Woodware.
- An A4 piece of card folded in half and then stippled with pink pastel chalk pad.
- Stamp randomly with the snowflakes and Let it Snow stamps using wisteria & rouge chalk ink pads.
- Stamp and emboss the snowman twice and the verse once with black ep.
- Cut one of the snowman and verse to size.
- Add colour to your images with the Direct to paper technique using about three colours, blue. lilac & pink.
- I then layered my images onto silver, lilac and dark blue and then I used double sided foam to lift them of the card.
- With your second image of the snowman cut this up and decoupage this on to your main image. I 3D the hat, pipe and scarf.
- Then add a bit of sparkle to your work with some diamond glitter glue, to the snowman face, pipe, purple bits of his scarf and then add dots around him.
- This card looks really good it the flesh not sure about the photo!!!!!
Enjoy
Tuesday, 2 October 2007
My First Bella Card
It's been a week since I lasted posted anything, so much for posting something every day! I do have a good reason though, we have all been poorly with colds and can you believe it but I have started up with another cold. Anyway, last night I thought I would get my new Bella stamps out and have a little play. I have been asked to make a card for a 40th birthday and I thought Bellaballoon would be perfect.
Shopping List
- Bellaballoon rubber stamp
- Black stazon ink pad
- Prismacolor crayons
- Pink glitter gel pen
- Peel off 40
- Pink pastel & white chalk pad
- Ice gold card stock from local market
- Pink brads from Woodware
- Pink Prima flowers
- Bazzill Basic pink card stock
- Happy Birthday Cuttlebug embossing die
- Magenta 12 x 12 paper, Foliage & Butterflies from Woodware
- Corner punch.
Attach a piece of Magenta paper to the main card with pink brads.
Cuttlebug the pink Bazzill cs with the Happy Birthday embossing die.
Then go over the embossing with a white chalk pad, this will make the words pop out at you.
Then layer this onto a piece of Ice gold cs, then cut with a fancy edge cutter.
Attach a Prima flower with a pink brad. Then attach the Happy Birthday panel to your card.
Stamp your Bella stamp on the ice gold cs with the black Stazon.
Colour her in.
Use your corner punch.
Colour the edge with the pink chalk pad. Then layer onto ice gold cs.
3D onto main card.
I then stuck my peel offs 40 on the balloon and then applied 3D glaze to make the balloons stand out.
I hope you have enjoyed this card.
Happy crafting!
Subscribe to:
Posts (Atom)