Tuesday 30 August 2016

Design team makes.....1 stamp..3 cards


Hello everyone...Genny here. I hope that you all had a fantastic bank holiday.I have to admit that having a bank holiday always confuses me..I won't know what day it is all the rest of the week..lol. I spent my whole weekend stamping and had a glorious time. I wanted to share the end results with you and take you through my stamping process. It all began with a flower stamp..now I have to be honest here I don't know who produced this stamp set because it was from a bundle of stamps that were given to me by a friend. I've had a look through lots of manufacturers and there are alot out there that are similar. Dreamees, Stamps by Chloe and Lellibot have similar ones. The stamp features the same flower in different sizes. For my cards I stamped the three largest stamps and some of the leaves. I wanted to layer them and use some kraft card as the background. The only thing that I have left to do is to decide what ribbon to add..I'm thinking either a red gingham or a red spot. The only difference between the three cards is the colour that I've used. The top one is coloured with my promarkers, the second with my watercolour pencils and the blue card is also done with watercolours.


I hope that you like them. I find it fascinating that just changing the colour medium can make such a difference. It all depends what you are looking for. It has amazed me just how popular kraft card has become and I think that it does give the cards a country feel. I used some stickles to finish off the middles of the flowers.

The cards below are just an extra to share with you. I needed to make some thankyou cards in a hurry and thought that I would use my watercolours as they were already out.


I first took some watercolour card and scribbled some colour on into 3 blocks..I only used 3 colours,  a red,orange and yellow. I added some water and blended then together. Then I stamped the two flower images using my Versafine and coloured them with my water colours. I had also stamped the images onto watercolour card. I finally mounted both items onto some black card, stamped a thank you at the bottom and added then to a 6x6 card.
Even though they are both using the same colours, they have turned out quite different. But it's so nice to have everything to hand to be able to make a quick card that looks a little special. I also added some stickles to these cards as the box was also out..lol.  Now if there is anything you need..stamps, inks, watercolours, card or paper or even stickles..just get in touch with Julie here at JB-Crafting Supplies.
Next week I should be doing some heat embossing.. I have had a message from a lady who is new to stamping and wants to do heat embossing. Because I've been crafting for so long, I tend to forget that some people are just beginning and some things I say must sound like a foreign language..lol. So next week I hope to go through heat embossing..so until then..take care and happy crafting.

Monday 22 August 2016

Design team make...The Loo Roll Book..step by Step

Hello everyone Genny here. As promised here is the step by step details of the loo roll book. I have never had as many messages as I have had regarding these little books. Even people who are not normally crafters seem to have been intrigued  by this little book. So here we go.

First things first..and that's to gather together all you need. I have used 4 toilet roll cardboard's..of course you can use as many as you like..as long as your book rings are large enough. You also need 2 pieces of grey board larger than the toilet roll cardboard's, 2 book rings (I used 1inch ones), some card to make the tags (I used kraft card), a selection of contrasting papers, ribbons and glue. For this project I would advise using a wet glue.


 The first job is to cover the greyboard with your chosen papers. I covered what would be the outside first, followed by putting a contrasting paper for the inside.

 I then flattened the toilet rolls using my bone folder to flatten them as much as possible. I then covered the whole thing by wrapping and gluing my paper around the roll.
 I then made to holes. Making sure that the holes in the cover was close enough in the middle to hold the toilet rolls and then using those holes to mark the spacing on the toilet rolls. For my holes I used my Cropodile. It is a tool that I've had for a number of years and honestly use it so much..it has been a wonderful investment.
 I then added toning borders on the edge of my toilet rolls. At this stage you can add any embellishments you like.
 I then took a corner punch and rounded the corners of the tags and punched a hole in the middle to hold the ribbon.
 I finally added my word to the front of the book. I have always collected quotes and use them a lot in my work..so I thought it would be nice to have a little book to keep any new ones I find.
If there is anything you need..papers, alphabets or embellishments then please get in touch with Julie here at JB-Crafting Supplies..as I always say she has an Aladdin's cave of crafting goodies.
I hope that I have explained it all clearly enough..but if you have any questions, please do not hesitate to get in touch.
So until next week..take care and happy crafting.

Monday 15 August 2016

Design team make...The Loo Roll Book


Hello everyone...Genny here. For today's design team make, I have created the loo roll book. I saw this book being made by the fabulous Rosemary Berry and just had to make it to share with you. Basically it is a tag book and you can make as many tag pockets as you wish. The empty toilet rolls form the tag pockets and the covers are made just using some grey board. I decided to make this to put pictures of my new kittens in, thinking that it would be a nice way to celebrate their first year. Of course there are so many ways that you could use this pocket book. Your grandchildren..perhaps a special day out or a birthday, your pets or even your garden through the year. It's a lovely way to scrapbook without having the expense.


For next week, I shall be making another tag book but doing it step by step. So start saving your toilet roll cardboards now. I also have an idea for using your empty cardboards for making a snowflake decoration...which I will share at a later date.
I am currently asking all my friends for their empty loo rolls in readiness for next week..lol. So until then..take care and happy crafting.


Monday 8 August 2016

Design team makes...Christmas ideas


Hello everyone..Genny here. I had every intention of blogging last week but sadly BT were not for letting me play. It seems to be one of the prices I have to pay for living in such a beautiful place. But finally here I am with a selection of Christmas Cards. Yes I know that it's only August but I like to think about it now and then I have plenty of time to decide what I'm going to do.

All my cards today are from Hobby Art and I have chosen to work with them because they are such good quality for one and the other reason is that I love all these images. Cards 1 and 3 are from Daryl the Quirky turkey stamp set and they have a similar sense of humour to last years Baa Humbug set.

The card below is Otto the Owl and is a rubber stamp..which is another form of stamp that Hobby Art do. Equally as easy to use to get a brilliant image.


My final 4 cards are all from the Nature Trail stamp set. I just couldn't help and have a play with this set and as you can see from the four cards below, depending what colours you use and what elements you pick..each is different. For all the cards below, I have stamped onto watercolour card using my Versafine ink pad and coloured them using my Lyra watercolours. I used a white Pentouch pen to add the snowflakes and of course I just had to add some glitter..after all it will be Christmas..lol


I hope that you like the cards and that you will have found a little inspiration. As always, should you want or need any crafting supplies..just pop over to JB-Crafting Supplies and speak to Julie. So until next week..take care and happy crafting.

Monday 25 July 2016

Design team make....One thought...5 projects


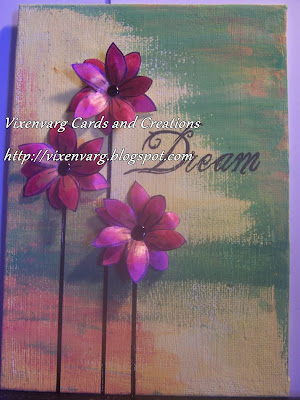
Hello everyone...Genny here. I have called todays design team makes..one thought..5 projects because I began with the thought of doing a large mixed media canvas but ended up making 4 other projects and the original piece is only half way finished..lol. My first idea was to use lots of die cut and stamped flowers, painted with my H2Os..which gives them a lovely mica shimmer. I began by getting together lots of die cut flowers which I had cut using plain white paper. I then painted then all with different shades. As I was waiting for the flowers to dry I found two small canvasses and deiced to paint them using my acrylics. So for the first two projects, I added three flowers..using a black peeloff as the stem, and finally stamped a different sentiment on both.


The following two projects were a happy accident. When I'm painting with H2Os, I always work on a piece of paper. When I had finished painting the flowers, I looked at the way all the colours had mixed on the paper and loved the look of it. So I took a flower stamp and stamped the outline in black..and then cut them out. I mounted them onto a piece of white which had been mounted onto a piece of black card.


And finally I actually began on my first idea..lol. I have painted a board with black acrylic and placed lots of flowers in opposite corners.I have added metal hearts, some jewels and some pearl dots. It isn't finished yet but I thought that I would share the work in progress. Hopefully next week I will be doing a piece on mixed media..so I will be able to share the finished piece then.


The one thing that I would recommend is that wherever you decide to work that the cats are banned from the area. I'm sure that my cats know as soon as the acrylics come out and cannot wait to dip their paws in it..hence I have now multi coloured paw prints over one of my armchairs..perhaps they fancied doing some mixed media of their own..lol. So untilnext week...take care and happy crafting.

Monday 18 July 2016

Design team make.....Birthday Teatime


Hello everyone...Genny here.For todays design team make I have used a stamp set from Hobby Art stamps called Teatime. It is a great stamp to create your own tea table. As everyone has seen lately..tea, china and old fashioned cloths have made a great comeback. For this card I stamped the cloth edging, teapot,jug,cups and cake stand with my Versafine inkpad. I then used my lyra watercolours to paint them. I also watercoloured the large cake and a collection of little cakes. The background was created by doing a watercolour wash onto a piece of watercolour paper. I mounted this onto a piece of pink backing card. Also from Hobby Art I used the verse and mounted that onto the same pink card. I finally added the two pieces of bunting which are from a Joanna Sheen Signature Die.

Following on from last weeks paper cutting make..I decided to do some thing different. I am lucky enough to be on the design team for Jiggery Makery. This is the team belonging to Adele, Julie's daughter. I decided to use one of her fabulous pin up digis and to create a piece of papercutting. I took the shape of the skirt and drew a design. I then cut it out and mounted it onto a piece of red paper.


I really enjoyed making both these cards and after all, this is why we all craft. Nothing makes me relax more than to work on a card or canvas project. Any thing that you need craft wise..please get in touch with Julie..here at JB-Crafting Supplies.

I hope that the weather is being kind to you, wherever you are. The sun is shining here in the mountains, so I can craft in peace because all my cats are outside, sunning themselves. Usually when I get my crafting goodies, they all arrive, wanting to help..lol. Well until next week..take care and happy crafting.

Monday 11 July 2016

Design team make...Paper Cutting


Hello everyone...Genny here. For today's design team make, I have been taking a step into a whole new world..the world of paper cutting. I must admit to have loved the look of some paper cuts for quite a while. Suddenly last week I decided to give it go and thought that I would share my makes with you. Both of these designs are by a company called Paper Panda and there are books of various designs out there. What set me off was this picture of the unicorn. But for my very first paper cut I decided to go with the butterfly below.

I intend doing another one of the butterfly now that I have got a bit more used to using a blade. It was a very quiet slow procedure..but I have to say it was quicker than I thought it would be..despite the ever helpful cats that decided to sit by my side as I was cutting. What I really loved was that basically you take a piece of paper, a craft knife, cutting mat and you end up with something lovely. I am already thinking of designing my own...which I will share with you in the next couple of weeks. So I was really pleased with my unicorn but no doubt , as I get more used to doing it..I will improve.

I love the idea of trying new crafts and then of course you can include them with all your other crafting makes. There is a lot of talk in the crafting world of mixed media work and I think that paper cutting could easily be included with other work. I hope that you like the paper cutting. For next week I will be doing some stamping inspired by watching a television show. So until then...take care and happy crafting.

Monday 27 June 2016

Design Team Make.......First Christmas Card


Hello everyone...Genny here. I always think to myself that I know what I'm going to be doing the next week and by the time that I get to this point ..many times I have created something different. As most of you know, most of the craft channels have been featuring Christmas products..far too early in my world..but I can understand that lots of us have to begin early in the year. I generally don't begin until August and I have several hundred to make. But due to all this Christmas television I ended up thinking of Christmas ideas. And I arrived at this card.

I began by painting some blue skies..using watercolour paper and my Lyra watercolours. I left the bottom white and created blue skies above it. I did about 5 A4 pieces. On one of them I stamped 4 Christmas trees, using my distress ink..Forest Moss.The stamp itself is a Hobby Art stamp..but you could use any Christmas tree one that you already have. I then cuts the trees out in a rectangle..placing the tree slightly on the left. I then mounted this rectangle onto some black card. I also mounted one of the plain backgrounds onto another piece of black card. I then went over both layers with a white ink pen and added snow falling and some snow onto the tree. I finally added some glitter and a ribbon.

To my mind, this is the perfect card to batch make. You could make a huge pile of backgrounds really easily..yet the finished card is quite special.

So I'm not even going to mention what I might be doing next week..my ideas well may change...but until then..take care and happy crafting.

Monday 20 June 2016

Design team makes....Stencils


Hello everyone ....Genny here. For todays design team make I have been playing with a stencil and trying different ways of using it. For the first make (above) I have stencilled onto black card. I first taped the stencil down and sponged through some white acrylic paint and let it dry. Then I went over it again,once dry with yellow,red and green acrylic. The white underneath made the colours really pop. It is important to not have too much paint on your sponge dabber..else it will flood under the stencil..as I found on my first attempt..lol. So put your dabber into the paint and then dab onto a spare piece of paper and then dab onto your stencil. The other important thing is to take your time and build up the colour bit by bit. When the stencilled image was dry, I went round the edges of the petals with a white pencil to give a little definition.

On the cards below I used my distress inks but twp different methods of applying. For the first one I used a blending sponge and on the second I used a stencil brush.


The distress inks I used were Worn Lipstick, Mustard Seed, Peeled Paint, Mowed Lawn and Spiced Marmalade.


As you can see, both the different methods produce a very different effect. The yellow flowered one, using a stencil brush, has a rougher texture than the blending sponge. It is important to keep your stencil brush upright and again to take your time, so that your bristles don't push under the stencil.
The blending sponge technique is my favourite. It gave a lot smoother impression and the colours looked a lot brighter. The final thing I did was edge the petals with a grey pencil and what that does is give the petals a little more definition and seems to make them pop off the page.

I'm hoping to use this stencil for another couple of techniques...shaving foam and texture paste. The texture paste I intend to make myself but for it to have a smoother texture than the one I used on the walling last week. I will share both techniques with you next week.

As always, if you need anything for your crafting..just ask Julie here at JB-Crafting Supplies. So until next week...take care and happy crafting.

Tuesday 14 June 2016

Design team make....The Funky Chicken


Hello everyone...Genny here. For this weeks design team makes I have been working with this fabulous stamp from Hobby Art. It is called Funky Chicken and is so much fun. Sometimes you just need to make a card that will raise a giggle or even just make some one smile..and these chickens certainly deliver. On all these cards, I made the backing paper by stamping the same pattern but in different colours.

On the first card I used the 3 cockerals, stamped them with my memento inkpad and coloured them with my promarkers. Since I made this card, I thought what a great 'boys on the town' card.

For my second card I just stamped the images into circles..looking from different ways and just thought it would make a great card to send a smile.


For my last card, I stamped the same chicken 3 times and coloured them differently..the same colours but in different areas. I added the sentiment 'don't flap'..another great card to send to a friend.


I know from my own card making that sometimes you just need that cheeky card for a friend and I really think these funky chickens fit the well. I am hoping to have another play with them soon, as I keep thinking of different ways to use them. When I have the time to have another play..I will share them with you.

I hope that the weather is being kind to you, wherever you are. Being a lady of a certain age, I have found the heat rather hard to deal with. So you will find me crafting in front of my fan..which guarantees fun when the glitter comes out..lol. The cats have discovered that in front of the fan is a good place to be..so I find that I have to share. So until next week...take care and happy crafting.

Monday 6 June 2016

Design team make.....Using Texture Paste


Hello everyone...Genny here. Today's make is a canvas using texture paste and I thought it would be good to share with you all. There are lots of different types of texture paste out there, all at various prices but I was talking to a friend and she said I am sure that you could make your own...so I did.

I wanted to make quite a course texture paste that I could use through a stencil that I had that looked like a stone wall. The recipe I used was 2 tablespoons of pva, 2 tablespoons of white acrylic paint, 2 tablespoons of talcum powder and some sand. I mixed them all together, adding the sand until it became a texture that I felt that I could use through the stencil. If it feels too thick, you can add a little water..by the same token if it feels too wet either add a little more sand or talcum. Then I placed my stencil onto a small canvas and applied the texture paste...as in the picture below.


I then let it dry.. I let it dry overnight to ensure that it was thoroughly dry. Then I painted the whole canvas with some acrylic paint that I had mixed to a colour I wanted for my stone. You can alter this to suit what you want to do. You could paint it all white for example or if you had the patience you could paint the spaces between 'the stones' one colour and the stones themselves another. It all depends what effect you would like.


While the paint was drying, I stamped out some flowers and leaves and coloured them with my lyra watercolours. I then added them to the canvas. While I was playing about with my texture paste I also realised that if you just wanted the paste to be fine don't add any sand,just add more talcum powder. That will create a texture similar to a plaster finish but would also be good depending on the look you wanted. This would give you aa finish that you would be able to stamp into. The only thing that I would add is to say that it's vital that you clean everything thoroughly as soon as you've finished. I have a couple of bowls which I keep together for making the paste in and a spoon and spreader. Everything is kept together in a cupboard ready for the next time. I've also kept a jar of sand..when I asked my friend for a jar of sand he was intrigued to what I was going to do..lol


I hope that you like the finished project and that you will have a go at making your own texture paste. For anything you need or want, please pop over to speak to Julie. I know that she stocks some brilliant acrylic paints in case you need any. So until next time..take care and happy crafting.

Tuesday 31 May 2016

Design team make..a card for a special friend

 
Hello everyone...Genny here. For today's design team make I thought I would share this card with you. I have made it over the weekend for a friend and really enjoyed making it. To begin I made an 8x8 gatefold card. I created 2 panels for the front and two for the inside of the panels.I cut the panels with a deckle edge and then inked them in a mixture of pinks and lilacs. I found the two flower sets in my stash, which had a matching mandela stamp. I stamped an absolute load of them, then coloured them with my promarkers and finally cut them all out. I have to say that it was all very calm whilst cutting..NCIS was on the television and all the cats were out in the evening sun. Normally they do love to help..lol


For the middle back panel, I found this silhouette image in my stash and thought it would make a great focal point as my friend is into dancing.I mounted that onto some rainbow card to match in with all the other colours.


The side panels are decorated with yet more of the flowers. And finally the back panel.I coloured that again with my inks and created an oval..so that I had some where to write. Stupid as I am, I had written it before I photographed..hence the blue piece of card. I left the inside of the oval clear but edged it with a small leaf tapestry stamp. I finally added 3 more flowers to the side.


I really enjoyed making this card. All over the place you can read about mindful crafting. A quiet space where you just concentrate on what you are creating. I think that this card must fit the bill. Even with all the cutting out..it was all very calm. So why not look at what flower stamps you have and create something similar. I would love to see what you can create. For any of your crafting needs or wants..just pop over to Julie here at JB-Crafting Supplies and she will help.

Well I'm off to do some more crafting..I think some more colouring is called for. Next week I will be sharing some stencilling and using some texture paste. So until then...take care and happy crafting.