 Besides all of that I have altered my £8 dress that I found in a charity shop to wear and have to get my 2 little munchkins ready on the day because its not wise to leave that to my husband!
So as you can see, I have definitely been running around like a chicken with my head cut off!
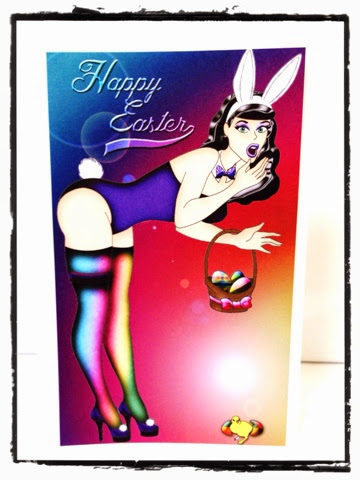 On to the show! As you know from previous posts, I am lacking in the colouring supplies area. However I do have photoshop at my disposal and can get quite creative with the colouring on there! You can achieve similar effects with different programs but this is the one I have and am familiar with.
 Basically what I did was I selected different sections of the drawing and coloured each one a different colour. To some I added some gradients, some I added some embossing or shadow effects and a few I went a bit further to add texture. I gave a satiny look to her hair and applied some patterns to the easter eggs. Once I was finished I created my background with a gradient effect and added a light source to the bottom right corner. When I was colouring in my girl I tried to keep the direction the light was coming from in mind so that my shadows and highlights were all facing the right direction. This applies to all forms of colouring so store it in your mental library!
I used the Happy Easter sentiment that was also provided to me and applied an overlay effect to that. This made it so that it wasn't too harsh but was still visible and left the focus on my 'bunny'.
To finish it off, I printed out the entire image, cut it out and stuck it on my 5x7" card. Voila! Quick and easy way to get a card out using mainly the computer and your printer!
Thanks again to Adele Bradwell with Jiggery Makery for the image! See you all next week!
Sam
No comments:
Post a Comment